Today we have a guest post from 'Puff photographer extraordinaire ashleybah!
So you've done it. You've finished knitting, crocheting, spinning, or dyeing your homework. You've written up a stellar story to make your homework fit the assignment. All that's left is taking a picture of the darn thing so you get those points that we all crave so much.
Unfortunately, as great as your story may be, the picture is all the professors have to see your homework. Don't just slap the first picture you take on your turn-in! You want to milk that project for all the points you can get. Here's a couple of things to keep in mind to make sure your pictures show the graders exactly what you've got going on! ;)
(Keep in mind that not every tip here applies to every situation. Take from it what you want. What's important is that you are happy with how your pictures represent your hard work. Take pride in your work! That's the Hufflepuff Way!)
#1. Know your camera!
Whether you are using your cell phone, a pocket point-and-shoot, or a fancy DSLR, you need to get acquainted with your camera. Check out those settings. One big setting to look out for is "white balance." This is the setting that can make your colors look way different in the picture than what you see in real life.
Most camera phones and cameras have a white balance set to "auto." This doesn't always work out for all of us. If you find your colors are coming out funky, try looking for your white balance setting. You'll find options like incandescent and fluorescent (typical indoor light options), and daylight and cloudy (outdoor light options).
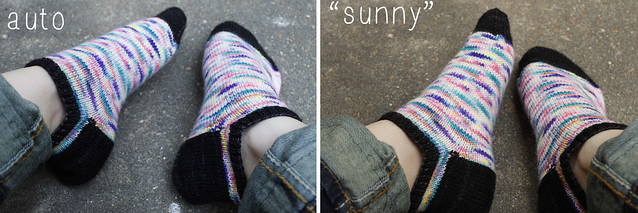
Here's some examples of how white balance can make a difference:
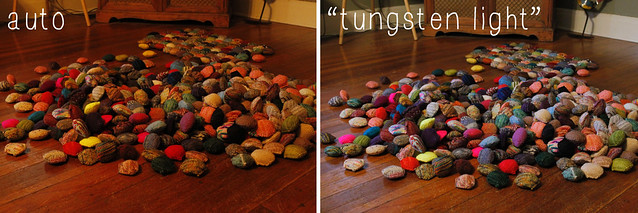
Sometimes it isn't even a huge difference, but the colors feel just a little cold or off. For example, the picture on the left below on "auto" isn't bad, per se. It's just not true to the real colors, which were warmer, and more fun! Just a little adjustment can make a difference in how the picture feels.
Another good setting to pay attention to is ISO. If the "auto" setting is giving you photos that are too washed out or too dark, try playing with the ISO setting. ISO is how sensitive your camera is to light. If you are outside in bright, direct light, you want to pick the lowest sensitivity setting, 100. If it's cloudy or shady outside, try a little higher like 200 to 400. If you are using indoor light, you want your camera to be more sensitive to light, so move that ISO on up to 800 to 1200.

Play with your camera and really look at your pictures after you take them. Adjust the settings and see what changes. You'll be a master in no time!
#2. Light, light, light!
We all know that our pictures just come out looking better if we can get a hold of some good ol' natural light. Even with all the settings adjusting tricks I've got, those indoor pictures just don't compare to natural light. So if you can, go outside!

Also, watch those shadows! Sometimes being outside can cast weird ones!

Sub-tip: Turn off that flash!
Now, I know a lot of us are crafting down to the last minute, leaving some of us stuck taking a picture at night. But even if you find yourself in this dark situation, flash is not the answer. Flash has a nasty habit of washing out your colors, making the shadows too dark, and giving people red face or demon eyes.
Find a room with nice light! Grab another lamp! Play with your settings! Make flash your absolute last resort.
#3. Find a warm body!
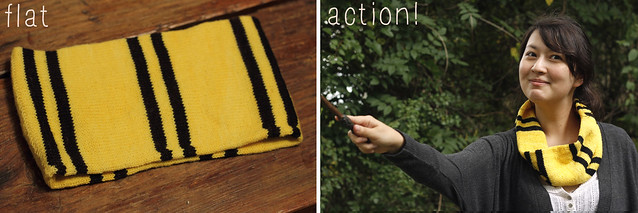
Is your homework something that is worn? That object actually being worn in the picture can do wonders! It gives the project more life and makes the picture much more interesting. The picture below of my Hufflepuff cowl laying on my table is pretty boring and doesn't tell anyone much about how it fits, or even what it is. If you've got a cute kid, adoring significant other, or even a pet that doesn't mind posing for a few minutes, GRAB 'EM.
Even a mirror shot is better than just laying your homework on the ground and shooting it flat.
#4. Watch your backgrounds!
First of all, you want to chose a background that complements your project. At the very least find a background that isn't too similar to your project, which will make your project disappear.
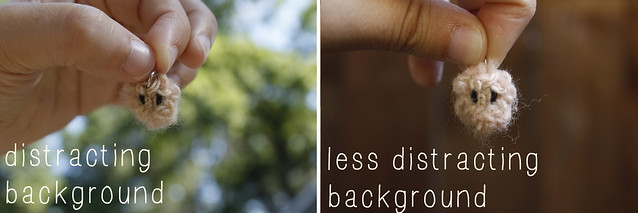
The picture below on the left has a distracting background because it's all bubbly, much like the puffy charm. Also the positioning of my hand makes the charm sort of disappear into the shadows, so it's not easy to see what it going on, especially at a smaller resolution. The picture on the right worked out a little better because the background is darker and my hand is out from behind the charm, which makes it pop a bit more!
Also, you want to make sure there's nothing in the background that you don't want other people to see. I can't tell you how many pictures I thought came out perfectly, only to find that my dog was standing beside my face in the background doing his business in the backyard. Needless to say, I had to take those pictures again. :|
I was going to include a great example picture I found while digging up samples, but I decided to spare your eyes. I'll describe it to you instead. I was sitting on the ground with my knees to my chest so my boyfriend could snap a quick picture of my socks. Well I didn't put much thought about what I was wearing or the pose, and with my rather short shorts and my boyfriend's up-close angle of the socks, the background ended up being my butt! So, you know, watch out for stuff like that. ;)
#5. Take LOTS of photos!
I can't stress this enough. For every one picture I upload online, I promise there were 10-20 pictures just like it that were either not in focus, or my face was doing something weird, or my dog was pooping in the background. Take a lot of photos, and take multiple pictures from each angle you think you might use.
Check your pictures out as you go along so you can look for all the things we talked about: lighting, backgrounds, and settings. Change things up as you go along and see what happens. Play and have fun with it, and I'm sure you will get the most points for your project! ♥
No comments:
Post a Comment